
“Docker is the easiest way to run TensorFlow on a GPU…”
One of the fastest ways to get started with TensorFlow and Keras on your local developer machine is using Docker. This is especially useful if you are working on a Windows machine with an NVIDIA GPU to speed up model training and inference. I have put together the following detailed setup guide to help you get up and running more quickly.
"Cargo ship close to Moreton island, QLD, Australia" - Photo by Borderpolar Photographer on Unsplash
Docker on WSL2 (Windows Subsystem for Linux) allows you to avoid incompatibilities you may see running directly on Windows by instead running in a Docker container for Linux. With an NVIDIA CUDA-enabled video card, GPU acceleration trains your models faster, improving your ability to iterate and find an optimal deep learning architecture and associated parameters for the solution you seek.
“Docker is the easiest way to run TensorFlow on a GPU since the host machine only requires the NVIDIA® driver …”
https://www.tensorflow.org/install/docker#gpu_support
Use the following steps to get all this working…
System Requirements
- Windows 10 19044 (aka 21H2) or higher
- CUDA-enabled GPU card – You can check your setup using the Verify your NVIDIA CUDA GPU setup step below
- Graphics card drivers installed – this should already be done. How else are you going to play Doom? ?
Install WSL2 on Windows
Your first step is to install WSL2 on Windows. Open PowerShell as an administrator (“Run as administrator”) and run the following command:
wsl --installYou can also choose to install a specific Linux distribution. In this example I am installing the latest Ubuntu LTS version.
# get a list of available distros

wsl --list --online
Results:
The following is a list of valid distributions that can be installed.
Install using 'wsl.exe --install <Distro>'.

NAME                                   FRIENDLY NAME
Ubuntu                                 Ubuntu
Debian                                 Debian GNU/Linux
kali-linux                             Kali Linux Rolling
Ubuntu-18.04                           Ubuntu 18.04 LTS
Ubuntu-20.04                           Ubuntu 20.04 LTS
Ubuntu-22.04                           Ubuntu 22.04 LTS
...
# install latest Ubuntu LTS
wsl --install Ubuntu-22.04For additional details: Install WSL command – How to install Linux on Windows with WSL
Install Docker
To download and install Docker Desktop for Windows and WSL2, see the Install Docker Desktop on Windows guide on Docker Docs.
Verify your NVIDIA CUDA GPU setup
Verify your setup using nvidia-smi
Run the following commands in PowerShell/Windows Terminal:
nvidia-smi should display CUDA information about your GPU. Example:
You are now ready to run TensorFlow using Docker!
Download and run the TensorFlow image
Run the following commands in PowerShell/Windows Terminal. Be sure to include the entire contents of line 3 below including the bash command at the end.
A bash shell will now be displayed in your terminal. Run these commands to confirm your TensorFlow image is working:
Use Docker Compose to run a TensorFlow project
We will now use a Docker Compose file to run TensorFlow and Jupyter Lab with a Computer Vision example that uses Keras, a Convolutional Neural Network and the PTMLib library.
- Clone the
tensorflow-gpu-dockerdemo project for this tutorial to your local machine
git clone https://github.com/dreoporto/tensorflow-gpu-docker

cd tensorflow-gpu-docker- Copy and rename the
sample.envfile to.env - Run using Docker Compose:
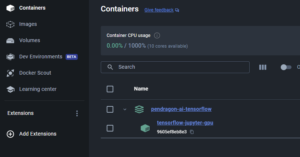
docker compose up -d- View the Logs tab in Docker Desktop, under
Containers > pendragon-ai-tensorflow > tensorflow-jupyter-gpu
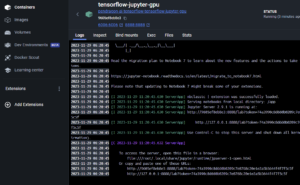
- Click
http://127.0.0.1:8888/lab?token=...in the Logs tab. This will launch Jupyter Lab.
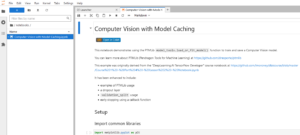
- Open
notebooks/Computer-Vision-with-Model-Caching.ipynbto run the sample notebook we have included
- Click the
Restart Kernel and Run All Cells...button
When this notebook completes running, all files are saved locally in tensorflow-gpu-docker/notebooks and will remain even after you shut down your Docker Container, allowing you to continue your work later. This is made possible using the volumes property in the docker-compose.yml file, which maps the /app/notebooks directory in the Docker container to the local tensorflow-gpu-docker/notebooks folder on your machine.
When you’ve finished working in Jupyter, shut down the Docker container using the following command.
docker compose downYou can now verify that the updated Jupyter Notebook file still exists on your machine under tensorflow-gpu-docker/notebooks for later usage.
Next Steps
Now that you’ve tried a sample solution, you can create your own notebooks and scripts using TensorFlow and Docker.
- Create your own notebooks in Jupyter Lab
- Connect to Jupyter Lab using VSCode:
- Copy
http://127.0.0.1:8888/lab?token=...used above. You will need this in the ‘Enter the URL of the running Jupyter server.’ step - Follow the steps at https://code.visualstudio.com/docs/datascience/jupyter-notebooks#_connect-to-a-remote-jupyter-server
- Copy
The combined power of Docker and WSL2 makes it much easier to get TensorFlow with GPU acceleration up and running quickly. You can avoid the challenges of managing library dependencies which may be incompatible with native Windows. It also makes it much easier to reproduce results consistently on other systems. I highly recommend this setup if you have a Windows machine with a CUDA compatible GPU.
I hope you get a chance to try out these resources personally, and that this setup guide helps you spend more time learning and experimenting with AI to build great products and real-world solutions.